Since an article about the Admiralty Experimental Station No 4
(AES4) was first issued in July 2012, I have been fortunate to gain access to
much more material. In particular, new information and pictures have come from
the Unst Heritage Centre, the collection of the late Lt Richard Feachem RNVR
and from Sqn Ldr Mike Dean MBE. Due to software limitations of the Blogger
software it has become necessary to split the article into 2 parts - Part 2
is here: http://ahistoryofrafsaxavord.blogspot.co.uk/2018/04/admiralty-experimental-station-4-unst.html
Very shortly after the start of WWII, Vice Admiral Sir James
Somerville, who was in charge of the Directorate of Anti-Submarine weapons and
Devices, witnessed a trial off the Suffolk Coast where a radar was used to
attempt to track a surfaced submarine. The trial was successful enough to
persuade him that radar could be a significant help in countering the U Boat
threat. There were concerns about defence of the Home Fleet – 2 U Boats (U-18
& U-116 had attempted to penetrate
Scapa Flow in WW1 and there were worries about U Boats and surface vessels
entering the Atlantic in an attempt to cause disruption to Allied shipping. It should be
remembered that, unlike modern submarines, most long distance travel by U Boats
was done on the surface – the ability to remain submerged for long periods was
limited – the crew members simply ran out of fresh air to breathe. Even with a snorkel,
submerged time was limited and, though not large, snorkels could sometimes be sighted
or detected by radar.
Somerville decided that a chain of 6 Coastal Defence U Boat Radar
Sites should be built in the North of Scotland to help protect Scapa Flow and
to provide a watch for U Boats/enemy shipping transiting between Shetland and Orkney or
passing just north of Unst. The most suitable equipment available at the time
was that planned for the RAF Chain Home Low (CHL) sites. The Naval sites, which
were originally developed separately from the CHL sites, were known as Admiralty
Experimental Stations (AES) and they were each allocated a number. The site on
Saxa Vord was AES 4, usually known as Saxavord (all one word) by the Navy. Radar
production for all 3 services required a large construction programme,
gun-laying radars, ship borne radars, radars against high and low flying
aircraft were all needed. Priorities changed as the threat was continually
re-evaluated and so, where there were similar roles, radar originally intended
for one service, was sometimes diverted to another project belonging to a
different service. Some equipment was interchangeable but not necessarily
identical. The Naval CDU sites, whilst similar to the RAF CHL sites, sometimes
had different equipment
The map below shows where these Naval units were built. The ones at
Dunnet Head and South Ronaldsay were primarily established to protect Scapa
Flow. The 2 sites on Fair Isle and the one at Sumburgh were to provide
surveillance of the waters between Orkney and Shetland. AES 4 at Saxa was to watch for traffic to the
north.

The sites were constructed in 2 phases and the programme was carried
out swiftly. AES 1, 2 & 3 (Sumburgh and the two sites on Fair Isle) were
built in the first phase. The earliest to become operational was at Sumburgh
which was opened in Dec 1939 – just over 3 months from conception to completion.
Later in the war the Sumburgh site was
moved nearly a mile northwards to Compass Head and was transferred to the RAF
as RAF Grutness. The second phase included AES 4, 5 & 6, with the last of
these 6 sites, at Dunnet Head (AES 6), becoming operational in Dec 1940.
The daring raid of the U47, Captained by Günther Prien, which
penetrated Scapa Flow in Oct 39 and sank the Battleship HMS Royal Oak, is told
in other places. Would the Coastal Defence Radars have made a difference had
they been operational earlier - who knows?
It is tempting to try to recount the history of all AES CDU sites but
I currently don’t have the data or time to tackle the task. In passing its worth mentioning that there was
a later 7th AES CDU built, but that was in NW Iceland at a place
called Sæból, where
its primary role was to monitor traffic in the Denmark Strait. From here on,
this section will be directed towards AES 4 on Unst.
In early 1940 Vice Admiral Somerville and a small party studied a
number of locations on Unst (incl Clibberswick – 160m/525’ ASL, an unnamed site
about 1 mile west of Outer Skaw and at Libbers Hill - 170m/558’), before
selecting Saxa Vord as the most suitable site for the radar. At 285m/935’ the
summit is the highest point on Unst and it was deemed to provide the best
coverage for the equipment to be installed. The following photo, sent to me by
Sqn Ldr Mike Dean MBE, is of great historic interest. It shows the original
reconnaissance party en route to survey the Saxa Vord site in Jan 1940. I
believe the group shown includes Vice Admiral James Somerville, Lt Richard
Feachem RNVR and Lt Evans RNVR. The Admiral, and possibly the same group of
men, carried out a similar mission on Fair Isle also during January. Lt Feachem
enjoyed the distinction of being selected to serve on all 7 Admiralty
Experimental Stations at different times during the war:


A substantial track, constructed in WWI and known locally as Whites
Road after the officer responsible for having it laid, led up to near the
chosen radar site. It had been made to enable a gun to be deployed to cover
Burrafirth in case enemy shipping attempted to use the Firth for shelter. Between the two wars the local population
used the route to access the plentiful peat banks on the hill. This track had
to be extended and improved before construction of AES 4 could commence.
As with the later RAF Station, the Admiralty “top site” was built in 2
parts. The lower section was where the generator and accommodation huts were
located and the upper area, where the radar equipment was to be installed.
There was no road between the 2 sites as there is now and so a 2ft gauge rail track,
approx 120 yds/110m long, was laid between the 2 sites. Similar rail tracks
were needed at some of the other AES
units and we are fortunate to have the following picture, once again
from the collection of Lt Richard Feachem, of the track at AES7 in Iceland:


Inside each of the blocks an operator had to rotate the aerial using
apparatus similar to that which drives a bicycle except, in this case, it was
hand turned. The equipment was designed at Cambridge under the auspices of Dr
John Cockcroft who, much later on, was awarded a Nobel Prize for his work on
Nuclear Physics. The actual gear in the photograph was at the CHL site at Worth
Matravers, near Swanage, and the picture was taken in Nov 40, just a few weeks
after AES4 opened.

At the top of the chain was a gearing system which looked like this:

The rotation had to be co-ordinated to ensure that the Receiver Aerial
was aligned with the Transmitter Aerial. The radar beamwidth, at around 30
degrees was wide, so exact alignment, although much preferable, was not always
essential. The Receiver Block also acted as the Ops Block and for some time the
radar display would have been a simple A Scope. To begin with it would have
been from here that the Units single telephone line ran to the manually
operated civilian exchange in the Haroldswick Post Office. From Haroldswick the
calls had to be routed via normal GPO lines to the Naval HQ at Fort Charlotte
in Lerwick. Later the telephones were linked to the system which ran from RAF
Skaw CH Station.
 Whilst I don’t have a photo of the interior of an AES Receiver Block
the photo below was taken inside a similar sized building at the RAF Coastal Defence/CHL
radar unit at Dover. The person on the left in the picture is Flt Sgt Wray and
the picture gives an indication of the limited working space available.
Whilst I don’t have a photo of the interior of an AES Receiver Block
the photo below was taken inside a similar sized building at the RAF Coastal Defence/CHL
radar unit at Dover. The person on the left in the picture is Flt Sgt Wray and
the picture gives an indication of the limited working space available.

Whether afloat or on land, naval personnel were assigned to a “ship”
for administrative and accounting reasons. During WWII the Royal Navy personnel
on Shetland were considered to be on board HMS Fox (shore based establishment –
HQ etc). The crews of naval Coastal Defence Forces – Motor Torpedo Boats etc were
considered to be aboard a Tender to HMS Fox called HMS Fox II. The establishment
of the CDU would also have been considered to be a Tender to HMS Fox and
personnel would have had cap bands saying either “HMS Fox” or possibly just
plain “HMS”.
AES 4 became operational on 24 Sep 1940 and was manned by Royal Navy
personnel, with support from RAF and, later, RCAF mechanics. One of the
Canadians, Puss Valeriote, made a nostalgic return visit to Unst in June 2000.
The Unit remained on the air for a short while after the war in Europe was over
in May 1945. Its work had not been limited to searching for submarines and surface
vessels – the radar had quite a useful capability for detecting airborne
targets. By the end of 1940/early 1941 the radar was detecting shipping out to the
radar horizon, 40 miles or more depending on the size of the ship, though for
smaller vessels such as trawlers, ranges of 25 to 30 miles were normal. Aircraft
below 10,000 were being seen at around 100 miles but performance of the early CHL
radar was not very good against higher flying targets. By the end of 1941,
following updates to the equipment, ranges against airborne targets had
increased considerably with ranges of 140 miles reported.
In the early years of radar, developments and improvements were taking
place rapidly and units, like AES 4, were frequently upgraded. The first major
change at Saxa was the changeover from 2 aerials to a single aerial. It would
have been sited at the Receiver Block. This change was made possible by the
introduction of a new Transmit/Receive switch and new feeder arrangements for
the aerial. Later, much better Transmitter valves were installed. Manual
rotation of the aerials was replaced when powered turntables were introduced
Evidence that the Receiver Block was extended to house the transmitter
equipment can be seen in this much later picture, where the foundations of the
extension are still visible to the right of the block.


In 1942 an even larger upgrade commenced. Work on new structure, known
as a Combined Transmitter/Receiver Block or sometimes as a 1941 CHL Building, began.
This was located half-way between the Receiver Block and the old Transmitter
Block. It was much bigger; measuring 50 x 18 ft. RAF Chain Home Low sites would
normally have a radar, like the one in the photo below, associated with the new
type of Building (the small aerial on the building itself is an IFF antenna).
Although I have not been able to establish its exact location, one of these
aerials would have been sited fairly close to the new block at AES4.

However, the Navy decided that they would like to add one of their own radars, a Navy Type 273. This radar was specifically designed for use against surface and low level targets and belongs in the group of radars the RAF knew as CHEL (Chain Home Extra Low). This decision was unsurprising as the detection of U Boats and enemy shipping was the main purpose of the Unit. This equipment was more usually carried on board ships. I don’t have a photo of one mounted on a 1941 CHL Building but photos of ship borne equipment follow:


However, the Navy decided that they would like to add one of their own radars, a Navy Type 273. This radar was specifically designed for use against surface and low level targets and belongs in the group of radars the RAF knew as CHEL (Chain Home Extra Low). This decision was unsurprising as the detection of U Boats and enemy shipping was the main purpose of the Unit. This equipment was more usually carried on board ships. I don’t have a photo of one mounted on a 1941 CHL Building but photos of ship borne equipment follow:

The “tube”, made of Perspex, was known as a “Lantern”. Inside was an S
band radar very unlike the RAF CHL equipment. The installation would have been
like that shown in the next 2 pictures:

Because this was not a “standard fit” for the 1941 CHL Building, the structure
at Saxa had to be modified and a small extension was added to the north side. The
following pictures, taken at much later dates, show the extension and the
aerial mount.


To give you some idea of the difficulties faced I have included a
photo of a similar radar to the Navy Type 273, one of its forerunners the Type
271, on the back of a lorry. The problem of winching something that size and
weight up a very steep slope on a 2ft gauge track is obvious.

The new equipment would require more power than the generator on site
could produce and so it was decided to lay a power cable from the Power House
at the RAF Skaw Chain Home site, 2 miles away, up to the top of Saxa Vord. The
track of the cable can still be seen 60 years later – it’s just to the left of
the white lines in the next photo, which was taken in Mar 2012.

The “dog-leg” in the track
shows where it crossed the Burn of Skaw. The cable was removed long ago as part
of an official contract and the copper recycled.
In the following photo the ruins of the RAF Skaw Power House can be
seen with Saxa in the distance:

The work on the 1941 CHL Building, RN Type 273 and power cables took
the best part of a year and the radar was actually ready a couple of months
before the new power supply could be connected. The new system became
operational early in 1943. I don't have an exact date that the NT273 became
operational but the RAF Skaw Power House log has an entry on 11 Feb 43 which
states, " Saxa alive at 13.45hrs (¼ load)". Regrettably, I have no
photos from the inside of a Naval CDU/CHL 1941 Building. The next 2 pictures
are of the inside of a similar building on an RAF CHL site (no Type 273 Radar
on the roof but some of the RAF sites had an early type of IFF aerial in a
similar place, as seen in a previous photo). The main division of the building
was into a Transmitter Room and a combined Receiver/Ops Room.

As seen on the right in the previous picture - at the really “sharp
end”, the radar consoles would have looked like this - the range tube on the
left and the PPI (Plan Position Indicator) on the right:

Whilst this work on the CHL
1941 building was being carried out another structure was taking shape to the
north-east of the Transmitter Block. A separate Mark III IFF (Identification
Friend or Foe) installation was added to the site. The small building, known as
a kiosk or cubicle was complete by Sep 1942, at which time the foundations for a
28ft mast were being laid alongside it. I’ve not been able to establish exactly
when the actual equipment arrived on site, IFF Mk III was much in demand at
this stage of the war and the allocation of IFF sets was prioritized between
the various service requirements. The completed installation would have been
like the one in the picture below – if you use your imagination and remove the
trees!

Although the mast was removed at the end of the war, the kiosk
remained until 1983.
To summarise the AES
4 structures, I have added a labelled extract from a May 1946 over flight photo.

A different extract from the same over flight photo shows both the
radar site and the site where the generator and rest huts were located. The
road down to Haroldswick is just where it is today. At the extreme right of the
picture, beside the road, some construction work can be seen:


I believe that water was collected from a spring in this area and
pumped to the site - there are records of up to 800 gallons of fresh water a
day being provided to AES4. In later years a pump house was built in the same
area to help provide RAF Saxa Vord Ops & Tech sites with fresh water. The
picture below shows the later RAF Pump House and I believe the arrow indicates the bed for a
generator used in the supply of water to AES4 :

Defence
of the Operations Site. The provision of anti aircraft weapons for the radar site was examined by
Admiralty Staff during much of 1940. In the end it was decided, because nothing
more modern or effective was available, to issue the Unit with 2 Hotchkiss Mark
1 Star machine guns. These were French designed and of WW1 vintage. The
particular model available was of British manufacture and had a .303 calibre. One
thousand rounds per gun, plus mountings and loading equipment were supplied.


There were
also many discussions early on in the
war about providing a Royal Marine guard force to protect the operations site.
However, it was decided that it was the responsibility of the Army. Platoons
from a number of regiments carried out this task, including from the Seaforths,
Royal Scots and Gordon Highlanders (many
of the personnel were from the Local Defence Force/Home Guard). At one stage the Gordons were
commanded by a certain Captain Conochie, a name which was to become familiar to
many who used Commercial Street in Lerwick in later years. A barbed wire barrier was erected
around the site and machine gun emplacements constructed, (the army guard force
would have had their own weapons). Later
on a second barbed wire barrier was added. Very little sign of the defensive
structures can be seen nowadays but there is anecdotal evidence which suggests
that some concrete remains behind the more recent RAF Saxa Vord Fire Section were
part of an AES4 defensive position:

The operations were run by the Royal Navy with, as mentioned earlier,
technical back up from the RAF and RCAF. There were occasional sightings of enemy
aircraft and, in 1941, a Heinkel III dropped a single bomb near the Transmitter
Block – luckily no damage was caused. RAF Skaw saw slightly more enemy action than
Saxa but the uncertainty would have been the same whichever site you were on.
There were few people on strength when operations started and the site
had to be run on a 3 watch system, one watch at work, the second at the Rest Hut
below the Tech site, in case of inclement weather etc, and the third off-duty
in Haroldswick. The Navy had been lucky enough to take over a decent sized
building at Haroldswick called Hamarsgarth, this is where the off-duty
personnel were based. As time went on the number of personnel increased and the
watch-keeping duties eased a little. The location of Hamarsgarth is illustrated
in the next (modern) picture, which also shows part of the route up the hill to
the radar site.
By late 1942 Hamarsgarth could no longer cope and two huts, 2 nissen
huts and a garage had to be built to accommodate the overflow. The next photo, taken by Lt Richard Feachem
RNVR, one of the Commanding Officers, shows Hamarsgarth during the war, with a
wooden hut on either side:

Another photo from Lt Feachem, is of the rear of Hamarsgarth - with a Nissen
Hut just visible at the left:

The Unit never had a large complement, being commanded by a Lieutenant
with a Chief Petty Officer as his deputy. As the only Navy Unit on Unst, the
staff were involved in the reception and provision of assistance to significant
numbers of refugees escaping from occupied Norway in small boats – this task could
be quite time consuming and the fact that the refugees included women and
children made it more complicated. The picture below, once again from
the collection of Lt Richard Feachem RNVR, shows one of the boats used by
Norwegian refugees which only just managed to reach Unst. Unluckier refugees sometimes
drifted north of the island and were fortunate if they eventually reached the
Faeroes or Iceland. This vessel sank alongside the pier and lay on the rocks. The
two on the boat are an RN cook called Marks and, beside him, Royal Marine Fred
Walsh - a Driver - who was the only man
among the navy CDU crews to be honoured for his
work during WWII.


To help in the feeding, clothing and processing of these Norwegian
refugees the Commanding Officer of AES4 was nominated as an Honorary Norwegian
Vice-Consul. The extract from a 1941 Alexander Sandison & Sons ledger,
shown below and held in the Skibhoul Archive, shows some of the transactions
carried out on behalf of the refugees - I don't think the current Norwegian Government would approve the
expenditure for 20 packets of cigarettes! :


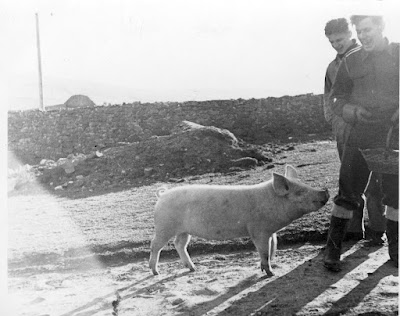
Among the naval personnel was Chief Petty Officer Stoker Alfred King.
He was a large man and older than the rest. He had served previously and had
been on the naval reserve before the war - in civilian life he had been a
butcher. He became well known locally and amongst the servicemen on Unst, in
fact many feared him due to his 20 stone frame and his reputation for a ferocious
nature. He is most remembered for organising the rearing of pigs (and their
slaughter), at Hamarsgarth. The photo below comes from the collection of the
late Geoffrey Sleigh and shows one of these animals at Hamarsgarth (perhaps close
to its last days!).

Some of the pork produced was eaten by the men but rumours persist
that some was used for local barter. Possibly in the hope of currying favour, a
special ham was sent to the Admiral Commanding Orkney and Shetland. The men of
AES4 must have become fairly self-sufficient in providing calories from
themselves and the output increased as the war went on. Hens were kept for
their eggs and meat, there are even records of the rearing of ducklings and
gosling - some of the crew, with Geoffrey Sleigh at the back, on the far right:

There is even a report of turkey being reared for the Christmas dinner in 1941. Fishing was also a significant occupation for those off duty, with large freshwater trout being reported as plentiful in the Loch of Cliff, less than 2 miles from Hamarsgarth. One haul from a sea fishing trip, reported in Jun 43 (possibly from Burrafirth), records 16 sea trout and 43 other fish (plaice & sole) on a single longline. War time rationing affected some people more than others!Some of those who served at AES4:

There is even a report of turkey being reared for the Christmas dinner in 1941. Fishing was also a significant occupation for those off duty, with large freshwater trout being reported as plentiful in the Loch of Cliff, less than 2 miles from Hamarsgarth. One haul from a sea fishing trip, reported in Jun 43 (possibly from Burrafirth), records 16 sea trout and 43 other fish (plaice & sole) on a single longline. War time rationing affected some people more than others!
The Unit had a complement of about 30 in 1943, slightly more than were
there at the beginning. A list of some of the personnel who served at AES4
during the war follows. Regrettably, I have found little data about most of them; should anyone have any information about
them (or about the Unit), I would be pleased if they would get in contact: gordon.carleATgmail.com
Lt J Addison Lewis 1st CO
Lt J Angus Orr
2nd CO arrived Jan 42
Lt KD McInnes 3rd
CO arrived 28 Mar 43 (referred to as Lt Ennis by some)
Lt RJ Wilkinson Relief vice Lt Orr - Aug 42 , returning as the last CO (44/45)
Lt Richard Feachem Relief CO vice Lt Lewis - Mar 41 and visited on technical duties Jun 42
Lt Richard Feachem Relief CO vice Lt Lewis - Mar 41 and visited on technical duties Jun 42
Lt Parker Relief vice Lt Orr - Dec 42/Jan 42
Lt N Astley Relief
vice Lt Wilkinson
Lt C Evans Technical
Visits
Lt Munro?
Sub Lt Corbett Mid
'41
Dickie Blackmore (an
officer)
Chief Petty Officer Alfred King
Petty Officer (Radar) JW Sheard - arrived May 43
Petty Officer Wilson
Cpl Freddie Batchelor (RAF Radar Mechanic)
Cpl Black (RAF
Radar Mechanic)
Fred B Grahame
(RCAF - detached from AES1 -
Radar Mechanic)
PT "Puss" Valeriote (RCAF
- Radar Mechanic)
Micky Porter (Radar
Mechanic)
Jack Diamond (Radar
Mechanic)
Paul ? (Radar
Mechanic)
Tubby Lucas (Telegraphist)
Fred Walsh (Royal
Marine Driver)
? Saxby (Royal
Marine relief Driver)
Danny Cook (Royal
Marine)
Bill Davidson (Leading
Seaman)
Ken Platt (Leading
Seaman)
Jack McEwan (Leading
Seaman)
Jack Warner
(Leading Seaman)
Shorty Hargreaves (Leading
Seaman)
SD Way (Leading
Seaman)
Doug Spinks (Leading
Seaman)
Tony Broughton (Leading
Seaman)
? Birkett (Leading
Seaman, Radar)
? Davidson (Leading
Seaman, Radar)
G Wilson (CD
Radar)
Arnold Layton (Able
Seaman)
Stan Pearson (Able
Seaman)
Frank Dunn (Able
Seaman)
Reg Ormston (Able
Seaman)
Frank Longstaff (Ginger) (Able Seaman)
Pablo Ablon (Able
Seaman)
Taffy Lewis (Able
Seaman)
Cliff Slater (Able
Seaman)
George Lovegrove (Able
Seaman)
Stoker Heaps (Able
Seaman)
Fred Boulton (Able
Seaman
E Graystone (Able
Seaman
? Marks (Cook)
Bill Stewart (Cook)
Phil Burgess
Geordie Kay
Rattler Morgan
Sam McClumont
Bob Tenant
George Crompton
Bill Wheeler
Geoff Hurst
Tug Wilson
Eric Mosley
Sid Harrop
? Newberry (Leading
Telegraphist
W McNamara
(Telegraphist)
RJ Hawkins (Telegraphist)
Geoffrey Sleigh (Able
Seaman)
The last two people on the above list, Geoffrey
Sleigh and RJ Hawkins, recorded some of their memories from their time at AES4
and I have added parts of their stories as Notes 1 & 2 at the end of this
article.
Whilst there were advantages with being close to RAF Skaw,
inter-service rivalries occasionally surfaced – nothing has changed. Very
infrequently, there would be local dances or shows from ENSA (Entertainments
National Services Association), to which the navy personnel were usually
invited. Although ENSA had some very good and famous artists on its books they
were spread thinly – leading to the acronym being changed by many servicemen to
"Every Night Something Awful". Despite the fact that most personnel
were a long way from home, a few of them developed an affinity for the islands
in the same way that RAF personnel at the later RAF Saxa Vord did.
Part 2 of this article is here:
http://ahistoryofrafsaxavord.blogspot.co.uk/2018/04/admiralty-experimental-station-4-unst.html
Acknowledgements
http://ahistoryofrafsaxavord.blogspot.co.uk/2018/04/admiralty-experimental-station-4-unst.html
I must acknowledge the assistance I have had in writing this article.
A number of people have allowed me to use their research and material. In
particular, I would like to thank:
The Unst Heritage Centre
Richard Charles Feachem, for allowing me to use
material from his father, the late Richard William Feachem
The late Geoffrey Sleigh
RJ Hawkins
Bob Jenner
Sqn Ldr Mike Dean MBE
David Waters
Irene & Tony Mouat
Karl Temple
Other Sources:
ADM 116 - 4275 Admiralty Experimental Stations -
Defence
ADM 116 - 4897 Admiralty Experimental Stations
1940 - 1944
AIR 26 - 092 - 70 Wing - Inverness
SD 4058
However, I accept responsibility for any mistakes
and will be happy to make corrections where necessary.
