First, it is necessary to digress a little. As a generalisation
there were two main types of Chain Home Sites known as "East Coast"
and "West Coast". The main visible difference was with the
Transmitter Towers. East Coast stations had broad based Transmitter Towers with
4 legs; whereas West Coast ones were simpler, with guyed masts, as can be seen
in the following images from the SD 0458, with the East Coast towers on the
left. (Left click on images to enlarge):


The 240' wooden Receiver Towers looked similar on both East
& West Coast designs. There were
other significant differences between the Operations Blocks and the equipment
they contained. As a rule of thumb the earlier stations were built to the East
Coast Pattern and the later ones to the West Coast pattern. The two Shetland CH
stations, to be different, had elements of both patterns.
The only wartime photo I have of the whole Skaw CH site was
taken in 1944 by a chap called Derek Lucas, who was posted to the adjacent AMES
713 LORAN unit in August 1944. Mike Dean kindly sent me a copy of his photo,
which is reproduced below:

The nearby Domestic site, the Power House and the Towers
stand out quite well. The Transmitter and Receiver blocks are heavily
camouflaged. The towers which can be seen are: the two Transmitter Towers on
the left, the two Receiver towers on the right and a much smaller
Identification Friend or Foe Tower in the middle.
Transmitter Site. The following Flash Earth Image
shows the location of the Transmitter Block and Towers. Clearly visible is the
perimeter of the WWII camouflage curtain.

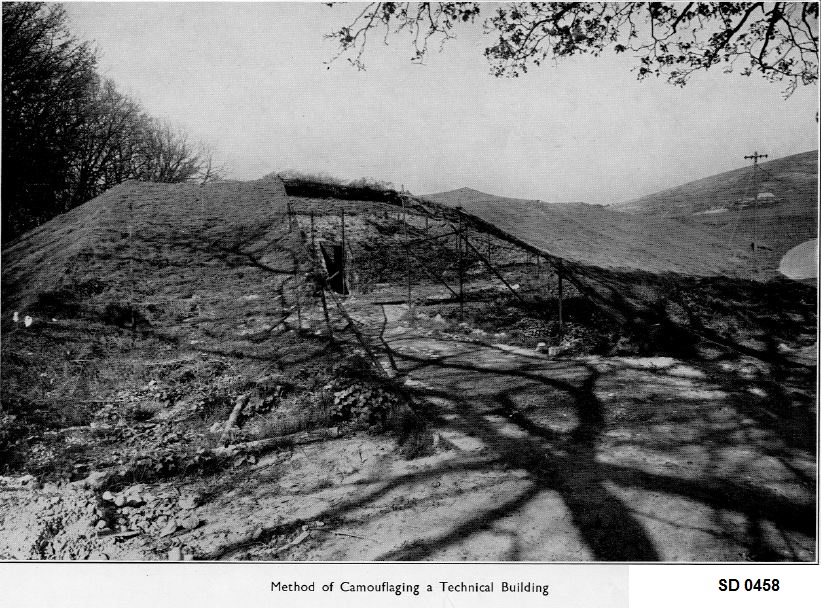
Extensive use was made of camouflage around all operational
buildings and an example of it can be seen in the next illustration, which
again comes from the SD 0458:
Each of the Transmitter Towers
was about 360 ' tall and the two at Skaw were about 350' apart. The four legs
of each tower formed a square with sides of 64' at the base. The next picture
shows the Transmitter Block at the left and the remains of the tower bases to
the right.

Looking at the Towers from afar one could easily get the
impression that they were radiating radio waves into the distance. In fact,
they were there just to support, and to provide access to, the equipment which
was the active part of the system. Suspended between the two towers was a cable
and, suspended from that cable, was a variety of antenna (dipoles) designed to
produce the required transmission pattern. A series of "exciters" was
used to amplify and refine the frequency transmitted. This type of arrangement
was known as a "curtain" and is illustrated well in this extract from the SD0410(1) , which has come via Mike Dean:


 The following picture, from the SD 0458, shows the type of Switchboard in a less
dilapidated state:
The following picture, from the SD 0458, shows the type of Switchboard in a less
dilapidated state:


Previous articles on RAF Skaw
Part 1 of RAF Skaw is here:
http://ahistoryofrafsaxavord.blogspot.co.uk/2018/04/a-history-of-raf-skaw-ames-no56-part-1.html
Part 2 of RAF Skaw is here:
http://ahistoryofrafsaxavord.blogspot.co.uk/2018/05/a-history-of-raf-skaw-ames-56-part-2.html
Part 3 of RAF Skaw is here:
http://ahistoryofrafsaxavord.blogspot.com/2018/05/a-history-of-raf-skaw-ames-56-part-3-ch.html
Acknowledgements:

.he Transmitter Block itself measures about 72' by 26' and
is surrounded by a blast wall and mounded earth for protection, as can be seen
in the next 2 pictures:


This Transmitter Block appears to be built to a "East
Coast" design with "East Coast" pattern Towers. Though it is
noticeable that some of the equipment inside would normally be associated with
a "West Coast" site. Not having a non-copyright plan of this type of
Block, with the help of Pete Brindley, I measured it and drew the sketch below:

A word of warning - unless you have experience of this type
of structure and have suitable illumination (+spare torches), keep out. They are usually unlit, have deep uncovered
cable ducts in the floors and there is plenty of old, rusty, jagged metal
about!

It is probable that this room housed "West Coast"
type equipment.

It would be normal for
there to be two transmitters with one of them able to take over from the
other immediately, should the need arise.


The largest room, at the western end of the Block, now
contains little except the frame of a mains switchboard, which can be seen in
the next 2 photos. Once again this type of Switchboard is normally linked with
a "West Coast" Site:-


RAF Skaw, like other Shetland Radar sites, had no WAAF service
personnel and, unlike RAF Watsness, AMES 55a, I have found no evidence to
suggest that the NAAFI employed females on site. Obviously this made life a
little simpler when it came to the provision of WCs in planning some of the
Skaw buildings. The Transmitter Block had a 2 seater as seen below:

The communications provided by the GPO were a very important
element in the operations of CH sites
and many buildings had significant space set aside for the telephone equipment
and operators

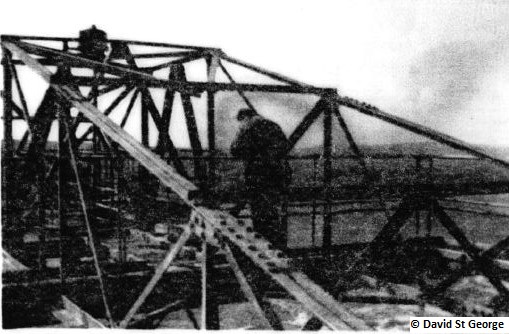
Before leaving the Transmitter area, two pictures from one
of the Towers. The quality is poor as they are reproductions from photocopies.
The originals were taken by David St George, who was a Radar Mechanic at the
Station in 1944 & 45. The first is of someone on the cantilever right at
the top of the steel mast and the second
is a view of one of the masts from the bottom:

Receiver Site. The
Skaw Receiver Site lay about 500 yards east of the Transmitter Block:

Unlike the Transmitter Towers, the East Coast & West
Coast Receiver Towers were similar. A closer overhead view shows the location
of the Skaw Towers, either side of the Block and about 300' apart. Unlike the Transmitter Towers there was no
complex curtain of metal between them and they were able to
"straddle" the Block:

They were 240 ' tall , made from wood and, in the case of
Skaw, assembled by the firm of Riley & Neat. I don't have any reasonable
pictures of the Skaw Towers but the
image from the SD 0458 below shows 4 of them, built to the same pattern as
those on Unst

The amount of timber used must have been phenomenal. The base
of the four legs formed a square with sides of about 43' 6". Each leg was
10" x 10" and, despite the
fact that the masts were dismantled in 1947, some wood remains in the steel
mountings for the legs:

From the centre of the base of each Receiver Tower a duct
was constructed to carry the feeders, which conveyed the received signal into
the Block for processing.

The exterior of the Receiver Block can be seen in the next
photo:

All blocks/bunkers of this period had more than one
entrance/exit to facilitate evacuation should there be damage from enemy
action. The Skaw Transmitter &
Receiver blocks were not exceptions but, since the end of the war, both have
had one of their entrances sealed. In the case of the Receiver building it is
the entrance on the western side, which can be seen in the photo above, that has been closed. Access to
the block is dangerous so do not attempt to enter unless you have a guide and
adequate illumination. The next 2 photos show the eastern entrance and the
unlit cable duct, which lies just a few feet inside the doorway. The duct is
deep, with plenty of jagged metal and dirty water - the Receiver Block is not a
place for the ill-prepared & unwary!


Once again I have been unable to find a copy of a non-copyright
plan of the building so, with the help of Pete Brindley, the following sketch
map of the Receiver Block was produced:-

Two things are immediately apparent from the plan. Firstly;
it is a much larger building than the Skaw Transmitter Block as it also housed
the CH operations personnel, Secondly; the layout of the building, unlike the
Transmitter Block, is to a "West Coast" design. At some stage in the
past practically all the equipment was removed so is difficult to guess what
was installed. In sequence. from the south end of the building. the following
pictures will attempt to show the interior of the block:
In the SW corner was a room which used to house the
Ventilation Plant:

The next picture shows a similar room from another CH site:

Opposite this room, in the SE corner, lies an area known as
the Distribution Centre. In recent years it has been used to store items for
some local event. This area has a deep duct which needs to be avoided:

I'm not sure what used to ne in this area but it seems
possible that it was the location of a Receiver Switchboard, similar to the one
shown below:-

The
next area appears to be a large chamber just inside the eastern entrance. I
believe that this area originally existed as two rooms
:

The central duct would have been covered over by wooden
floorboards. I think that the place where the photo was taken from would have
been a separate room housing a transformer and the area on the other side of
the duct would have been the site of a radar receiver. From this area there is central
corridor which runs over the main duct. The duct runs the length of the
building and, at one time, carried the feeder links in from the Receiver Tower.
In some areas the duct was covered by a concrete floor, in others by removable
wooden floorboards which provided access to the equipment below.

On the west side of this corridor there appears to be a room for the PBX, Office Space and a short
corridor to what was the western entrance, before it was blocked off.


On the eastern side of the corridor there were 2 WCs, with
washing facilities, a store cupboard and the Battery Room:-


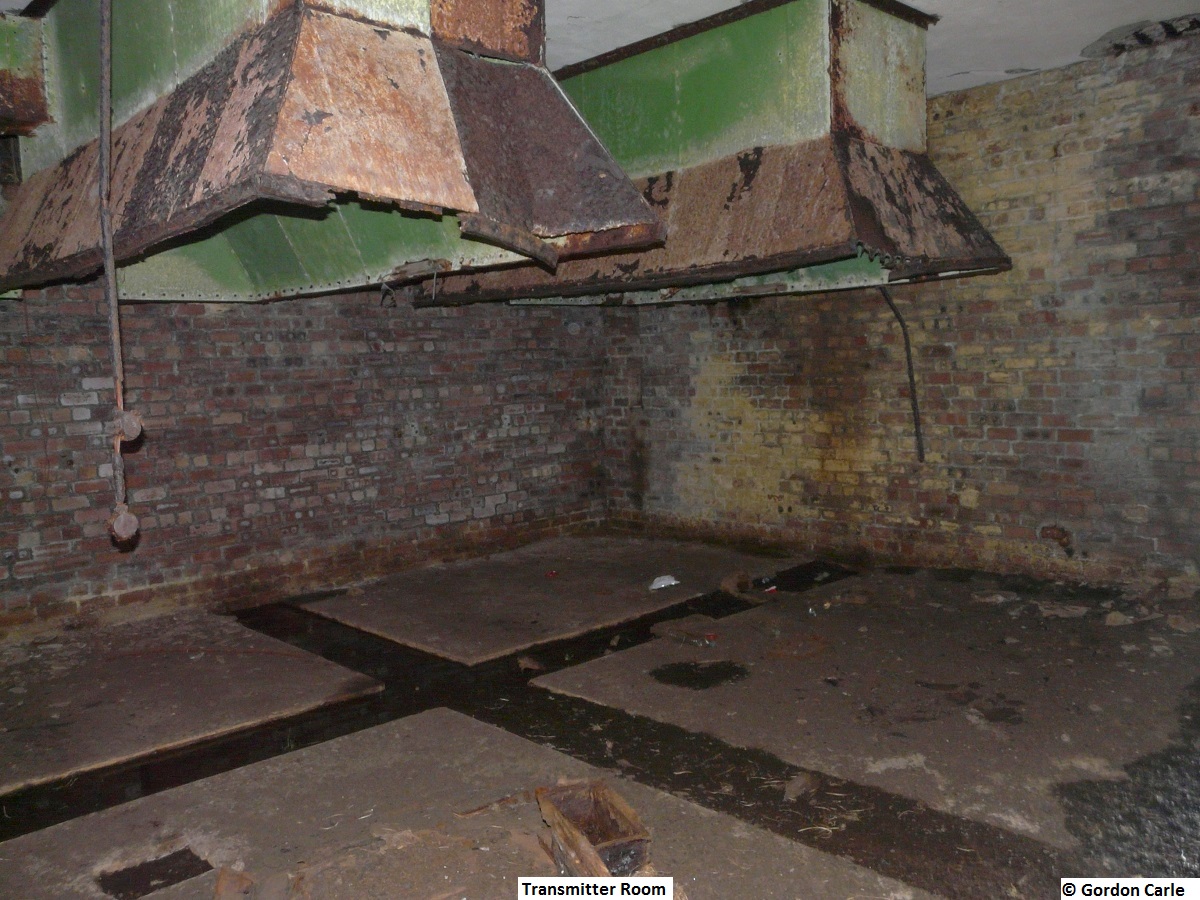
The next room is the largest in the building and it is likely to have been altered during the life of the station as new equipment became available. The Control Room is now empty and has a large cable duct in the centre, which used to be floored over:

During WWII the room would have looked like the one
illustrated in the SD 0458 though Skaw actually had an RF7 Receiver in place of
the RF8 shown in the picture below and Skaw had no members of the WAAF on Strength:


Another view of a similar CH Operations room from the SD 0458:

The Console, Mark III illustrated in the next picture, is of
a type installed at RAF Skaw during December '42:

There is just one
more room in the Receiver Block. It's at the north end of the building and it
is a long, relatively narrow space called the GPO Room & it housed much of
the communications equipment:

In a future section there will be some information about the
other buildings which played important roles in the fife of those who served at
RAF Skaw.
Part 1 of RAF Skaw is here:
http://ahistoryofrafsaxavord.blogspot.co.uk/2018/04/a-history-of-raf-skaw-ames-no56-part-1.html
Part 2 of RAF Skaw is here:
http://ahistoryofrafsaxavord.blogspot.co.uk/2018/05/a-history-of-raf-skaw-ames-56-part-2.html
Part 3 of RAF Skaw is here:
http://ahistoryofrafsaxavord.blogspot.com/2018/05/a-history-of-raf-skaw-ames-56-part-3-ch.html
SD 0410(1) - Supervisors Manual
SD 0458 - Photographic Record of Radars Stations (Ground) - Air Ministry Aug 43
Mike Dean MBE
John Hearfield - http://www.johnhearfield.com/Radar/Magnetron.htm
Bob Jenner
Pete Brindley
Rita Carle
SD 0458 - Photographic Record of Radars Stations (Ground) - Air Ministry Aug 43
Mike Dean MBE
John Hearfield - http://www.johnhearfield.com/Radar/Magnetron.htm
Bob Jenner
Pete Brindley
Rita Carle
CONTENS LIST